Author Topic: CZ trigger job - Over travel fix  (Read 26063 times)

0 Members and 1 Guest are viewing this topic.

Offline provvv

  • Jr. Member
  • **
  • Posts: 95
Re: CZ trigger job - Over travel fix
« Reply #15 on: February 24, 2017, 09:10:52 PM »
Dan--you did a great job! I'm so glad we have people like you that know how to do this type of stuff.

Offline DanT

  • Jr. Member
  • **
  • Posts: 83
Re: CZ trigger job - Over travel fix
« Reply #16 on: February 26, 2017, 10:58:23 AM »
I have been making the shims smaller thinking that less mass might reduce the problem with them "letting go" under recoil.  This approach was not working as I was having problems in particular with the rear trigger shim and to a lesser extent the disconnector shim as well.

As I was pondering this, I think I figured out problem.  95% of a solution is a good understanding of the problem.  That way I can attack the root cause (why?) vs. the symptom (the shim breaks loose).

Play with the trigger assembly.  "Fire" the hammer, then with the trigger still held all the way back, press the hammer back into place.  The hammer is caught by the disconnector.  Hmmmm.....

Consider that with a "full auto" trigger pack, the evo is rated at about 20 rounds per second.  That means the firing sequence is really getting that hammer moving with quite a bit of energy, even for us who are only firing one shot at a time.

"Catching" the mass of the hammer, especially in the actual firing sequence is quite hard on the disconnector.  I have seen posts were certain versions of the disconnector have actually broken due to this "catching" stress.  The disconnector is not the only thing being affected here.  The disconnector shim also absorbs this "hammering", which can break the epoxy bond.

I see the CZ custom shop hammer has a big hole in the middle of it to reduce the weight.  Likely, this speeds up the time from trigger release to impacting the firing pin.  In view of the pounding the disconnector takes catching the hammer, I can see where lightening the hammer would be helpful to reduce the pounding going on to the trigger assembly.

Likewise, after the hammer is "caught" by the disconnector, releasing the trigger causes the disconnector to release, releasing the hammer, which then is "caught" by the trigger hooks.  You can hear the trigger reset as it seems to catch with a lot of force.  This is the force of the trigger spring plus the force of the hammer spring plus the force of the firing pin safety as applied to the lever arm near the hammer accelerating the weight of the hammer into the trigger hooks.  The trigger hook then instantly stops the hammer acceleration dead in its tracks until the next time you pull the trigger.

Again, this "catching" action by the trigger hooks is carried to the rear trigger feet.  This "catching" action is like "whacking" the rear trigger shim with a small hammer each each time the trigger is released and the trigger hooks need to catch the rapidly accelerating hammer.  The force of this acceleration can be felt if you try to stop the trigger from "snapping" forward after the trigger reset.

Thus the problem is not "recoil shear force" like I originally thought, but rather pounding from the trigger and disconnector feet onto the top of their shims.

Thus, it seems to me the solution to this problem (pounding of small trigger/disconnector shims until the epoxy breaks) is to use a physically longer and wider shim. Thus, even if the epoxy directly under the trigger and disconnector foot were to be pounded to dust, the metal further away from the point of impact would remain firmly anchored down. 

At least that is the theory.

The trigger over travel shim does not take any pounding (just the user trigger pull force) and thus can remain fairly small. 

The shims I first started out with were longer and wider and seemed to work fine, but the more problematic ones lately have been the smaller versions.

From what I am reading (see 3M white paper http://multimedia.3m.com/mws/media/774716O/mechanicals-versus-structurals.pdf?&fn=MechanicalsVsStructurals.pdf), "modern" two part, slow drying epoxy glues can be better than screws, rivets, spot welds, or welds.  JB Weld falls in this classification with a gripping power of almost 4000 PSI.  These shims are stoutly attached.

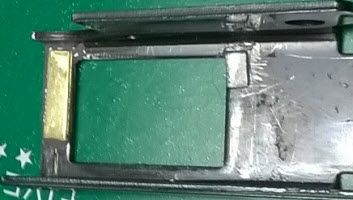
Here is the trigger shim (0.032") and smaller trigger over travel shim (0.013")


Here is the disconnector shim (0.016") on the trigger shelf.  It could perhaps be a bit wider:


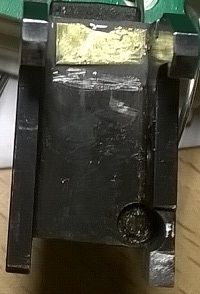
Excess epoxy is shown here.  After a few hours the slow dry epoxy gells up and the excess can readily be removed with a toothpick.

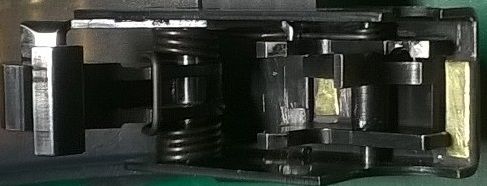
Here is everything thing in the trigger assembly after clean up and drying overnight.  The rear trigger shim is deliberately just short of the second trigger foot.  I want pounding from one end only, not both ends.


I will run it by the range and see how it does probably Monday.

- DanT   Phoenix, AZ
« Last Edit: February 27, 2017, 08:15:38 AM by DanT »

Offline DanT

  • Jr. Member
  • **
  • Posts: 83
Re: CZ trigger job - Over travel fix
« Reply #17 on: February 27, 2017, 10:19:55 PM »
The shims did well at the range today.  Nothing broke loose.  There epoxy around the shim near the trigger and disconnector foot seem fine.  The larger, wider shims are looking good. I will get one more chance to take it to the range before things get super busy at work.

Just for more information, here is how the trigger hook look on the front hammer wing for different trigger shim heights.  First, no trigger shim (top), then 0.016", 0.025", and lastly 0.032" (current configuration) on the bottom:


The 0.032" case above is not hair trigger and I don't want it to be.  I would be concerned about how well the safety would work with a "hair trigger".  There is still a fair amount of trigger travel required to fire the hammer, but much less than the stock configuration.

For comparison, here is a shot of the CZ Custom Shop trigger hooks on the front hammer wing:


Oh, well...  Work is going to get in the way of fun for a while for me.

- DanT   Phoenix, Az

Offline Joost

  • Jr. Member
  • **
  • Posts: 54
Re: CZ trigger job - Over travel fix
« Reply #18 on: March 01, 2017, 05:13:32 PM »
Thanks Dan , for all the info on the scorpion trigger.

The angle on the hammer vs triggerhook looks kind of strange to me...

I would have to see it in person when i get Mine.

Keep on the good work!

Offline DanT

  • Jr. Member
  • **
  • Posts: 83
Re: CZ trigger job - Over travel fix
« Reply #19 on: March 01, 2017, 10:08:13 PM »
The trigger hook angle is the "positive engagement" that makes the trigger safe.  As you pull the trigger, a safe trigger hook angle "cocks" the hammer back a bit.  Changing the hook angle such as to "just barely" cock the hammer is a trick to lessen the apparent trigger pull as you are fighting the hammer spring less by doing less "cocking".

It is unsafe to have the hammer move forward towards "firing" as the trigger is pulled.

There is no way I am going to modify that trigger hook angle.  I don't want to screw it up and have to shell out $90 for a new trigger.  The trigger pull weight is fine as it is. 

I got to the range a second time this week, and shims still look great.  I think this is a keeper.

- DanT   Phoenix, Az

Offline DanT

  • Jr. Member
  • **
  • Posts: 83
Re: CZ trigger job - Over travel fix
« Reply #20 on: April 10, 2017, 02:44:11 PM »
I have now made many trips to the range, and the latest trigger shim mods (0.032" brass rear trigger shim, 0.016" brass disconnector shim, and 0.013" over travel shim) are solid and work very well.

These metal shims were made from brass trips I found on amazon.com.  I spend perhaps $20 on the metal for these three shim.  Very little metal is needed. The brass typically comes in 12" strips. 1/2" or 3/4" wide stock is fine.

Using JB Weld (the slow cure formulation) rather than JB KiwK (the fast cure formulation) fixed the problem I had with the shims breaking free.  I just made sure I roughed up both sides being glued and clamped the shims when I glued them to make sure the glue did not add to the thickness.  These shims are now not coming out willingly!

It was not easy to clamp the disconnector shim without removing the trigger (the trigger is in the way for clamping), so it ended up too thick.  I had to file that shim down to get the disconnector back to the point where roughly 50% was in contact with the hammer shelf.  If I did it again, I think I would find some way to apply weight to the top of the disconnector shim while it is being glued in order to get it closer to the desired spacing. 

If the disconnector shim is too thick, the rifle will fire "doubles" as the disconnector does not have enough "bite" on the back of the trigger shelf to reliably stop the hammer when the receiver cocks the hammer after firing a shot.   The shim then needs to be filed down to get enough rear shelf "bite" to stop the doubling.

If I measure trigger movement by changing the size of the shim at the back of the trigger, this is what I see as I reach the end of this modification:

0.032" used for initial trigger "take up reduction"
~0.014" from this point to tripping the trigger
~0.015" of trigger over travel after firing the trigger

Thus, from the rear of the trigger, there is about 0.060" of total travel in my stock trigger.  Taking out the 0.032" rear trigger shim and the 0.013" over travel shim, about 0.015" remains.  Thus these modifications have removed about 75% of the total trigger travel, and about 70% of the trigger travel before the trigger fires.

The trigger is not "hair trigger" since 30% of the travel is still left, but is very much improved (and predictable!) from the very long pull that the rifle had when I first started out.

- DanT  Phoenix, Az

Offline Asmodeus

  • Sr. Member
  • ****
  • Posts: 378
Re: CZ trigger job - Over travel fix
« Reply #21 on: April 10, 2017, 04:04:05 PM »
I was only in there long enough to polish the edges of parts that rotate or rub, and mildly go after the disconnector face where the hammer butts into it during the trigger pull.  But, why not drill, tap, set screw to get where you need to be?  The disco foot has enough material to punch straight through the bottom out through the top, tap, install screw.  And be able to adjust it with the hammer discharged and the lower popped out.  I would use red loctite on the screw but you would be able to have it all installed and adjust it, while the loc-tite was drying still.  In other situations a small tack from a welder is what I have done.  And then just ground it to where I wanted it exactly.  Or through drilled as mentioned above, and installed a bit of drill rod and tacked over the top then ground the protruding face to exactly where I wanted it.  (On other FCG's) 

Because this functions very similarly to an AK FCG, aside from that absolutely poor multi-purpose trigger return spring that adds a ton of weight.  The parts interactions seem extremely familiar to me.  I was able to hack the weight almost in half by simply pinching the trigger spring to take some of the preload out of it.  And grinding the disco face back at the same  angle as stock, so it has less material interaction with the hammer, without compromising the engagement surface.  (And paste/grease lubricant)  I did break the upper horizontal edge of the nose of the hook.  As it had a distinct flat nose.  But did not cut the nose back or interact with the hook portion at all.  I may.  And I definitely have re-cut plenty of disconnectors to make them 2 stage or not before. 

I am very happy that you have the majority of the necessary dimensional changes worked out with shims.  But I don't see shims/glue as a viable long term solution for the reasons you have already found.  If you're dead set on using shims.  Use steel shims and then spot weld them to the trigger pack housing.  Finish with a file.  I haven't found epoxy to really last in an environment that is in constant contact with solvents/lubricants.  And I like my FCG's coated in a lubricant paste. 

Offline DanT

  • Jr. Member
  • **
  • Posts: 83
Re: CZ trigger job - Over travel fix
« Reply #22 on: April 10, 2017, 11:55:15 PM »
Actually JB Weld is not a typical epoxy.  It is often used in automotive engine repairs in a hot, dirty, greasy, oily environment with high level of vibration. Sounds perfect for a gun.  I have seen in the rimfire forums where JB Weld was used to add "metal" to a 10/22 trigger part.  I have heard it being used to fix broken bike frames.  It is very tough stuff.  Not all epoxies are created equal.

Actually, I was motivated to use the shims because I thought that this approach would be a bit more accessible to the average enthusiast who might own these guns.   Welding, or drilling and threading have a much higher risk of ruining a $90 part than gluing a shim in place.  This modification can be done for under $20 using some tin snips and some metal strips from Amazon.com.

- DanT  Phoenix, Az
« Last Edit: April 27, 2017, 09:09:40 AM by DanT »

Offline c4v3man

  • Newbie
  • *
  • Posts: 1
Re: CZ trigger job - Over travel fix
« Reply #23 on: April 27, 2017, 01:54:28 AM »
I performed this full mod, with .032 pre-travel shim, .016 disconnector shim, and .013 overtravel shim on my SBR and it works extremely well, no doubles tonight in around 80-100 rounds, and a dramarically better overall pull, immediate reset, etc. Felt much faster to run, and absolutely much more pleasant to dry fire. Thank you DanT so much for your work and research on this method of trigger adjustment, it saved me $200+ on going the cz custom route.

Offline DanT

  • Jr. Member
  • **
  • Posts: 83
Re: CZ trigger job - Over travel fix
« Reply #24 on: April 27, 2017, 11:26:37 AM »
Quote
I performed this full mod, with .032 pre-travel shim, .016 disconnector shim, and .013 overtravel shim on my SBR and it works extremely well, no doubles tonight in around 80-100 rounds, and a dramarically better overall pull, immediate reset, etc. Felt much faster to run, and absolutely much more pleasant to dry fire. Thank you DanT so much for your work and research on this method of trigger adjustment, it saved me $200+ on going the cz custom route

I am glad it worked well for you.  It has been a great improvement for me.  If anyone wants a set of shims, private message me and I can cut up a few and send them out a few for a few bucks.


- DanT  Phoenix, AZ
« Last Edit: April 27, 2017, 12:12:48 PM by DanT »

Offline medphys

  • Jr. Member
  • **
  • Posts: 40
Re: CZ trigger job - Over travel fix
« Reply #25 on: April 27, 2017, 10:20:23 PM »
I'd like to give a shout-out to DanT for coming up with this awesomely simple and inexpensive mod.

I'd also like to offer up another option for this mod (with his permission).  This mod won't be as ideal as the original one with the three shims, but it's a simple way to decrease the trigger reset distance.

First I made two 45 degree cuts in the FCG housing, then used a crescent wrench to bend the inside rear cross section up a bit. The metal being bent up takes the place of the rear shim. I then took the housing to a belt sander (a file will work too) to flatten the bottom (when you bend the rear cross section, it also protrudes down in the rear a tad).  Adjust the amount of bend as necessary and clean with a file. Cold blue and oil and you're back in business :)

It may be possible to do the same thing under the forward trigger stop, but I have not tried that.  Yet.

Thanks again to DanT for the initial work!


« Last Edit: April 27, 2017, 10:22:18 PM by medphys »

Offline backtrack9

  • Newbie
  • *
  • Posts: 5
Re: CZ trigger job - Over travel fix
« Reply #26 on: May 27, 2017, 12:31:16 PM »
I just wanted to throw in my 2 cents worth on this excellent modification done by DanT.  I obtained a shim kit from DanT and added them to my trigger pack after dry fit testing them.  After I was satisfied the shim sizes put the engagement points close to the desired settings I glued them all down with JB Weld.  I reassembled the trigger and worked through function checks.  The JB Weld does add thickness no matter what you do.  If you clamp it too hard then the bonding layer is too thin and may crack and fail.  Lightly clamping the shims in place is best.  The added thickness caused the over-travel shim to block the hammer release.  With slow application of a jeweler's file I reduced the thickness enough to allow the hammer to clear the trigger sear.  Both the primary and disconnector sear engagement was reduced by ~40%.  This is allowed for a more than adequate reduction in trigger rearward and reset travel while maintaining safe engagement.  Once the trigger pack was placed back into trigger housing and the safety levers installed, it became apparent the trigger pre-travel shim needed to be thinned down slightly to allow full safety engagement.  Again, a little filing and slowly checking progress fixed the issue.  The end result was surprising!!! Easily made the biggest improvement in my Scorpion since adding the HBI springs.  The trigger is responsive with minimal pre-travel, clear and short reset.  I just wanted to say thank you to DanT for posting this excellent modification!  I plan to take it to the range shortly and test it out during live fire.  If there is any revelation afterward, I will update the community.  Than you again DanT!!!

Offline DanT

  • Jr. Member
  • **
  • Posts: 83
Re: CZ trigger job - Over travel fix
« Reply #27 on: May 29, 2017, 01:22:04 AM »
When using the JB Weld (not JB Kwik), the thickness of the glue is not an issue.  Fore the thickest shim, the 0.032" "pre-travel" shim, I used vice grips to throughly squeeze out as much glue as possible.  This is exceptionally stout stuff,  so it is not going anywhere with even a very thin film of glue.  Squeezing out the glue as much as possible helps maintain the thickness.  However,  if that is not done, filing down the shim sets things right.

The most important thing is to make sure both the shim and the surface get "wetted" with the glue.  I rub the glue into each side with a toothpick to make sure both surfaces are really "wetted" before I clamp things together. 

Also, in order to get the maximum gain out of the rear "pre-travel" shims, the post under the safety should be filed down so that the safety clears with the rear shim in place.  See earlier in the chain to see which post to file down for the safety to clear.

I am glad it worked out.  It has been a great improvement to my trigger I know.

- DanT  Phoenix, AZ

Offline TomFoglio

  • Newbie
  • *
  • Posts: 7
Re: CZ trigger job - Over travel fix
« Reply #28 on: June 10, 2017, 07:03:16 PM »
Dan T, this forum has been tremendously helpful.  You are a pioneer of scorpion triggers man.  I've gone with 016 pre travel and over travel shim and it made such a massive difference. I decided to play with the disconnector (reset) and found that about 023 was needed to get a good bite on all sears.  Again, what an amazing difference.  I used loctite metal/concrete epoxy because of the 3200psi strength and so far it's holding tight after several hundred rounds.  Thank you for sharing this information!

Sent from my SM-N920V using Tapatalk


Offline greyling22

  • Jr. Member
  • **
  • Posts: 68
Re: CZ trigger job - Over travel fix
« Reply #29 on: July 21, 2017, 02:30:35 AM »
So I'm cheap and have a dremel tool and some calipers, so I cut apart a federal 308 case I found at the range. The neck measured .015 and the base .035. I haven't tried them in the cz yet, but with a little jbweld under them they might be pretty close to perfect. And who knows, someone might find another case that works better.


« Last Edit: July 21, 2017, 10:34:05 AM by greyling22 »